%20removebcg.png)
Build a Productive Notion Dashboard for Daily Planning in 5 Mins
April 15, 2025
Table of Contents
If you’ve ever opened Notion and felt overwhelmed by the empty page — don’t worry, you’re not alone.
But what if I told you that in just 5 minutes, you could turn that empty screen into a fully functional daily planning dashboard?
This beginner-friendly guide walks you through exactly how to set up a simple, beautiful, and productive Notion daily dashboard — no experience required.
What You’ll Build in 5 Minutes:
- A clean dashboard with today’s timetable
- A section for monthly calendar
- A simple way to track tasks, meetings, events, etc.
- A place to write your daily goals
- A list view to easily check off your to-dos
Step 1: Set up your Notion page
Open Notion. In the left sidebar under your Private workspace, click + Add Page. Give your page a title like: Daily Planner Dashboard.

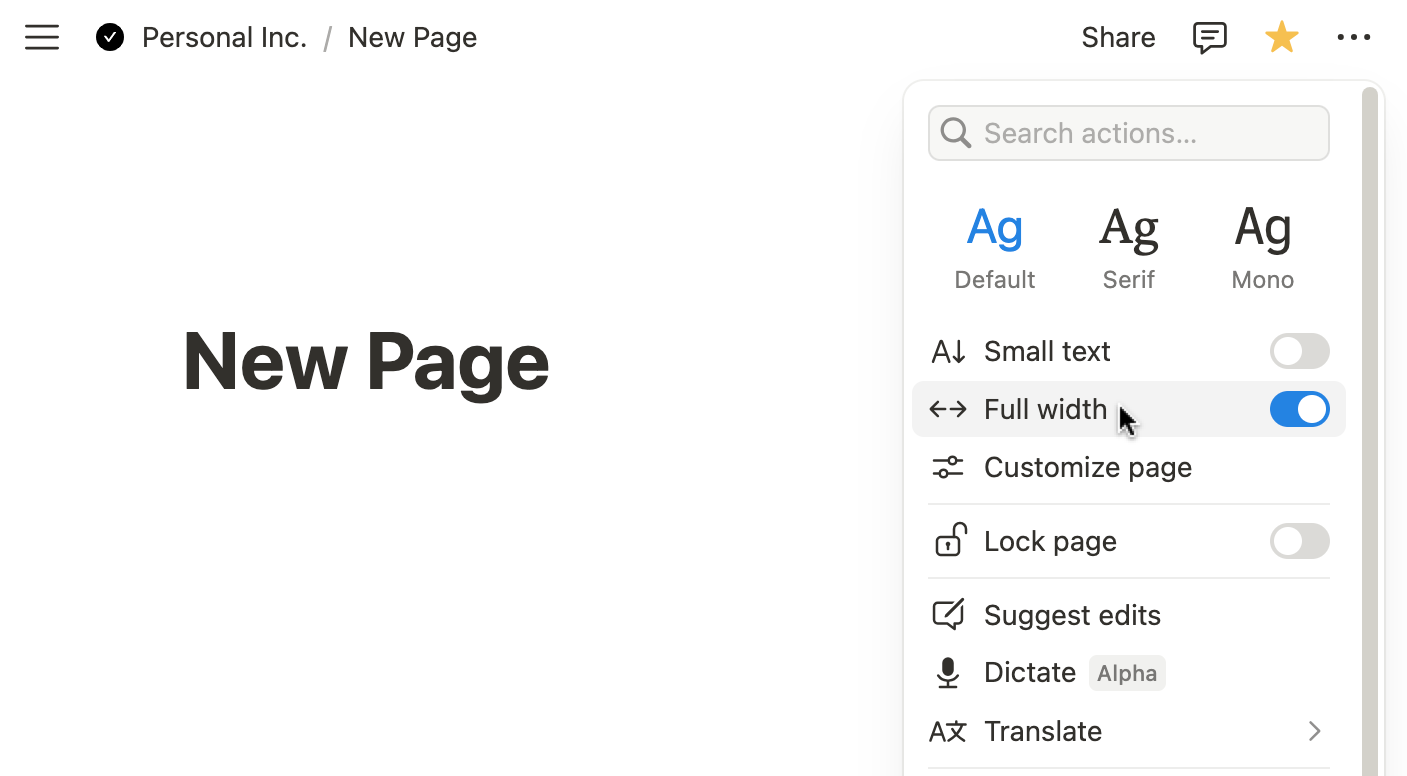
In the top right corner, click the three dots (…) to open the menu. Select Full Width to maximize your page canvas.
Step 2: Design the layout for your dashboard
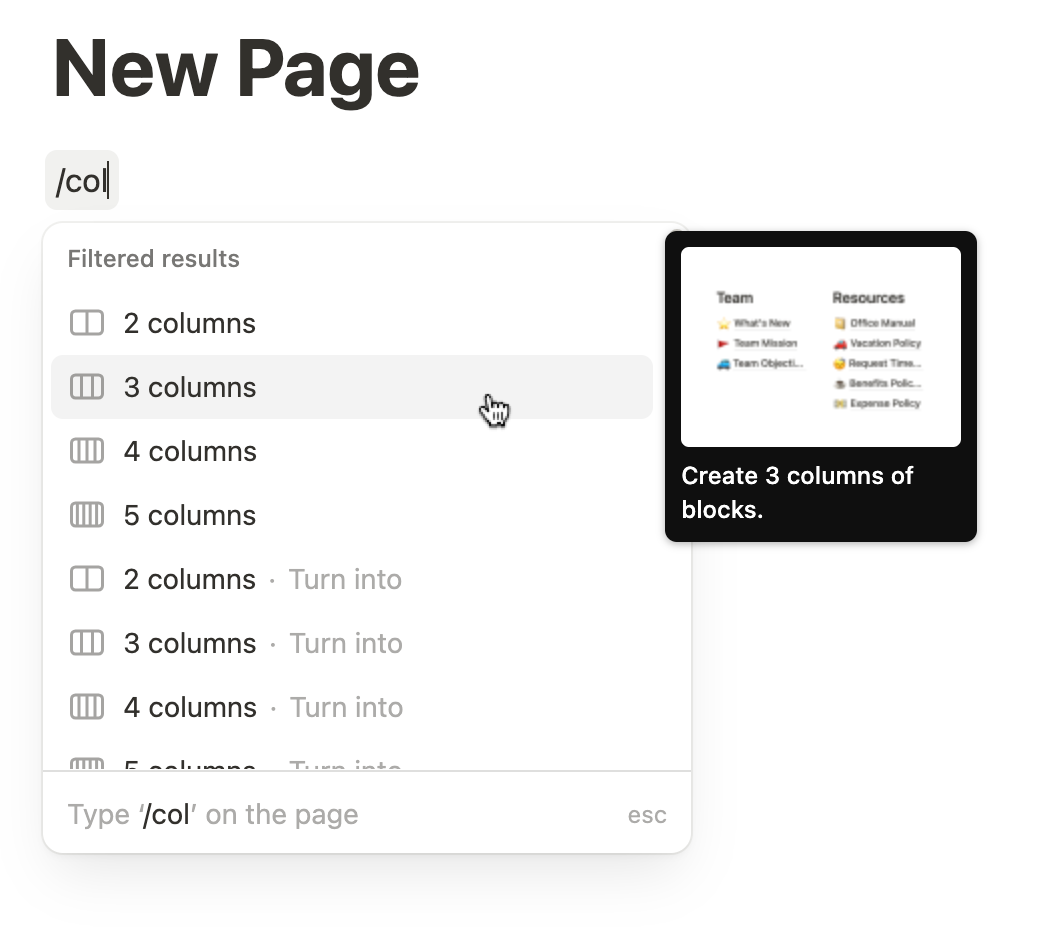
You can organize your dashboard by splitting it into columns. On the empty Notion page, press / on your keyboard Type "column" to add a 3-column layout.
To adjust the spacing, simply drag the edges of each column to make them narrower or wider according to your preference.

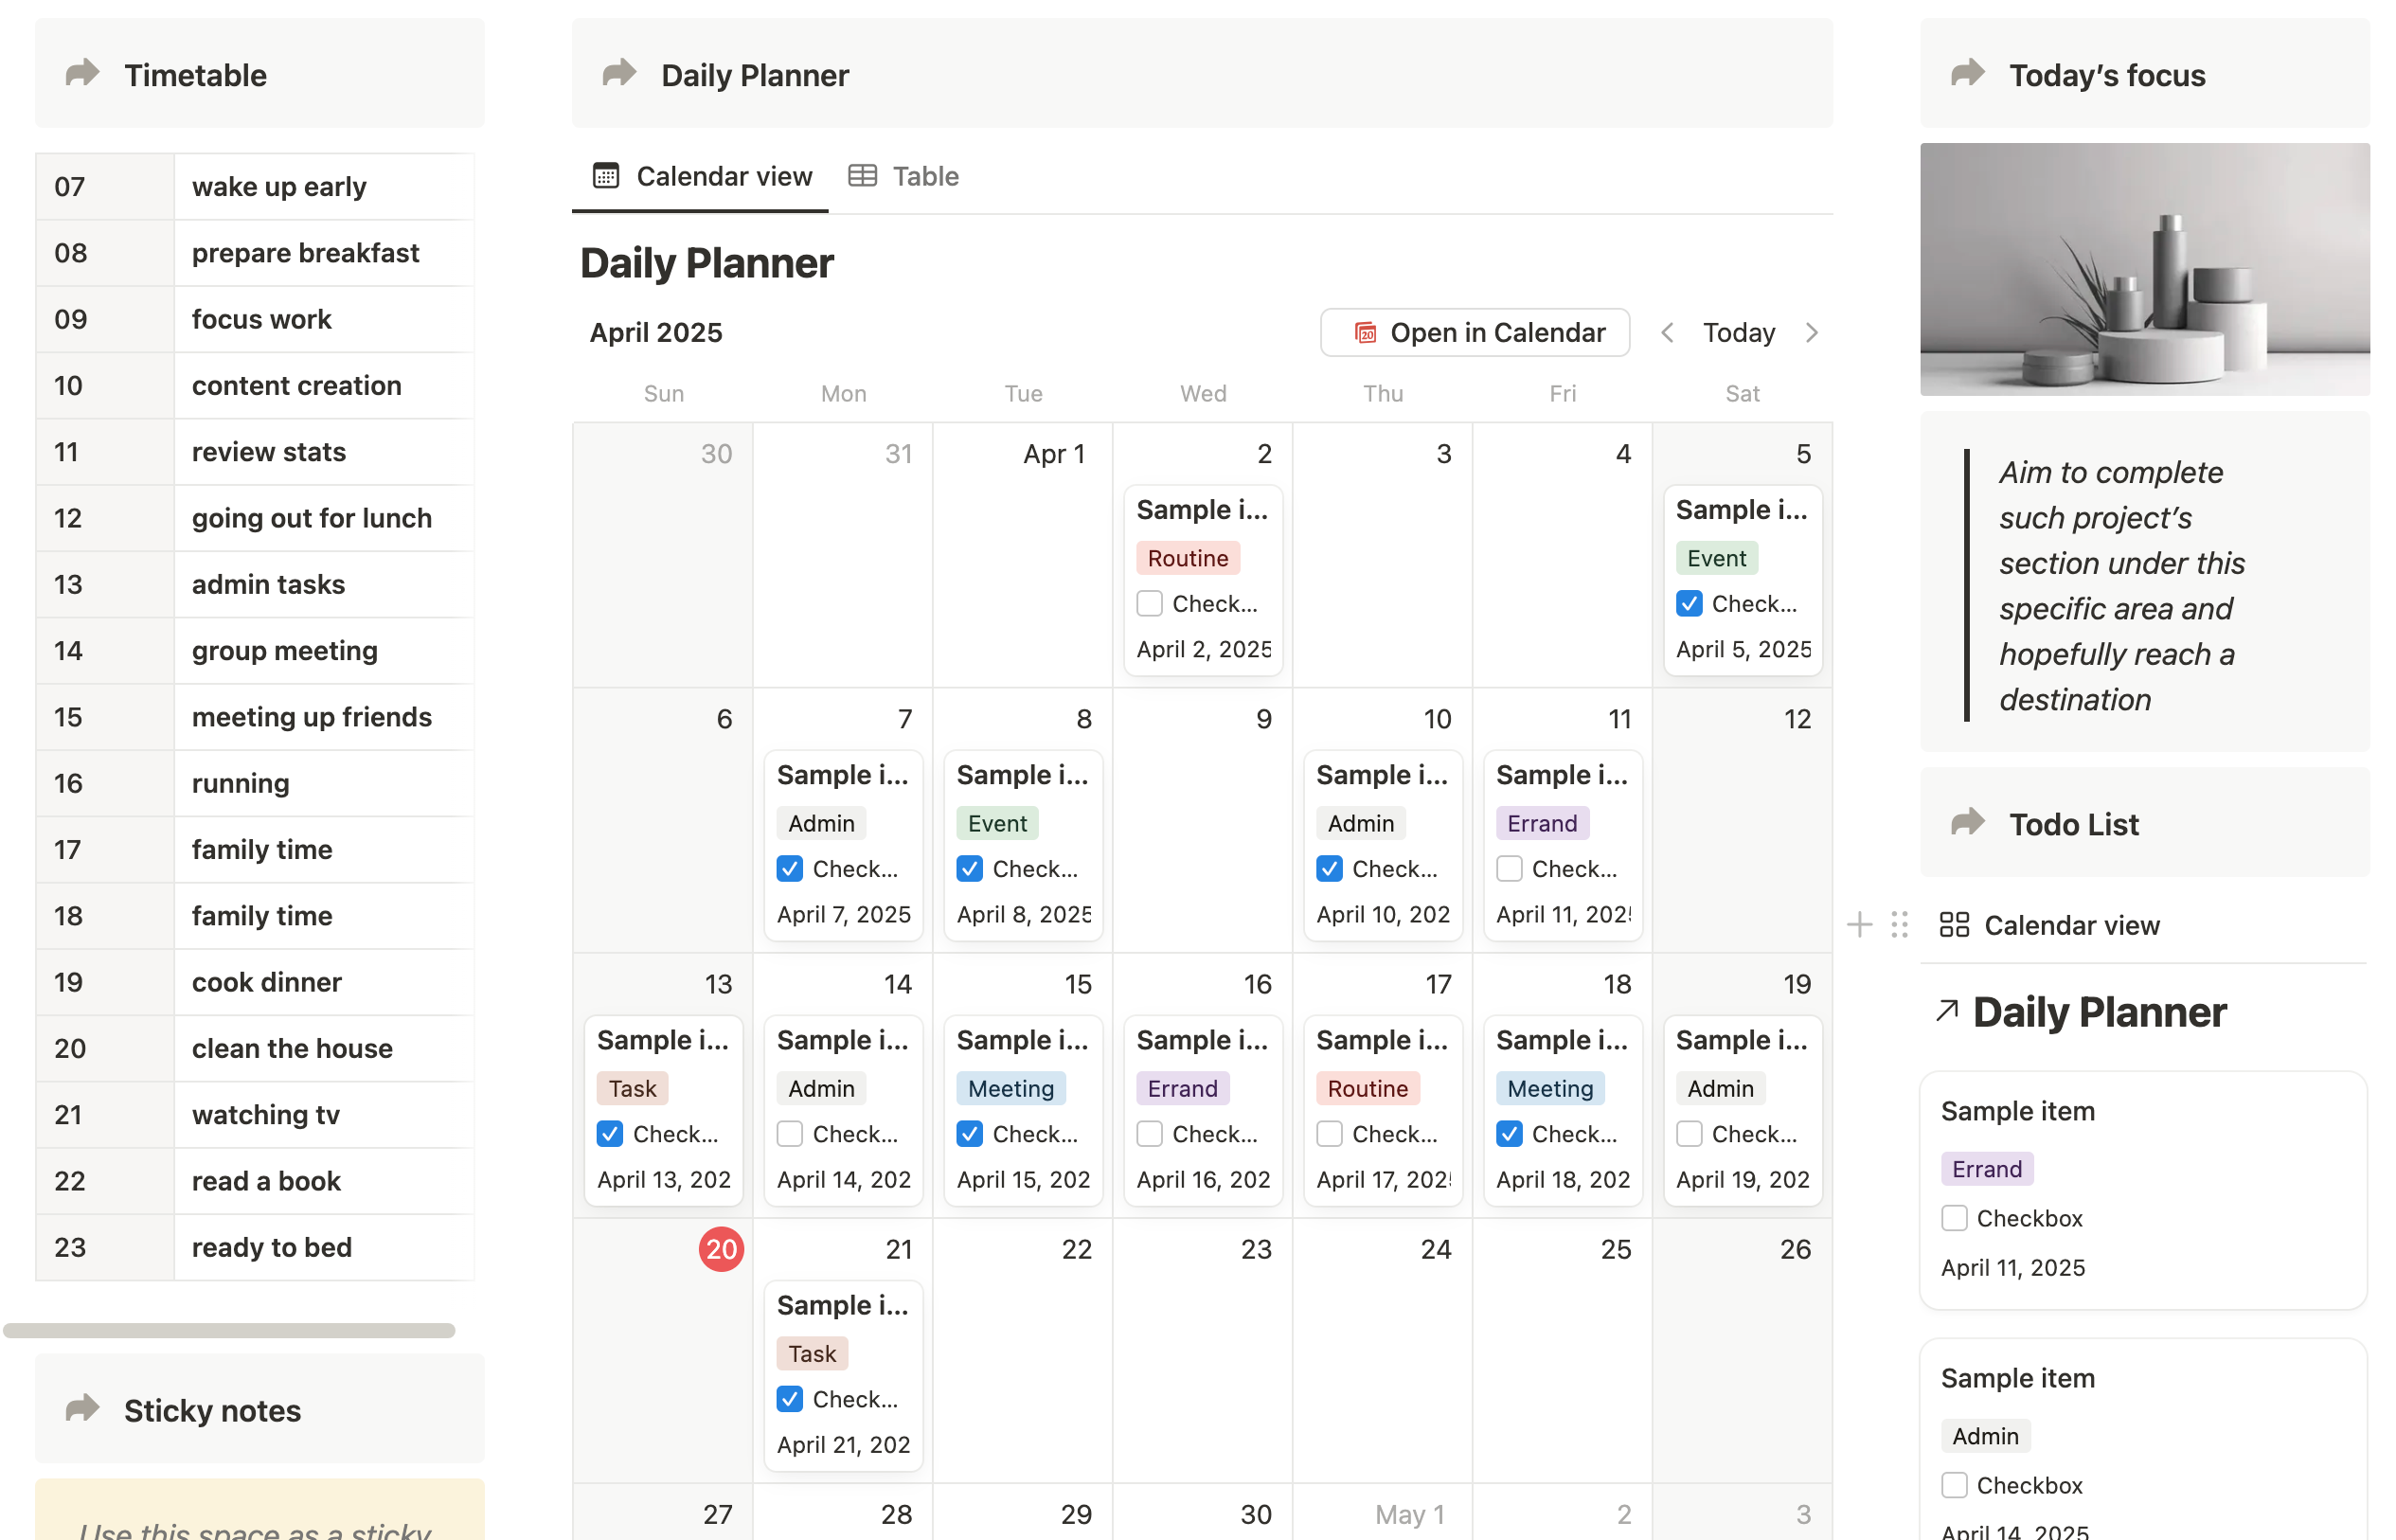
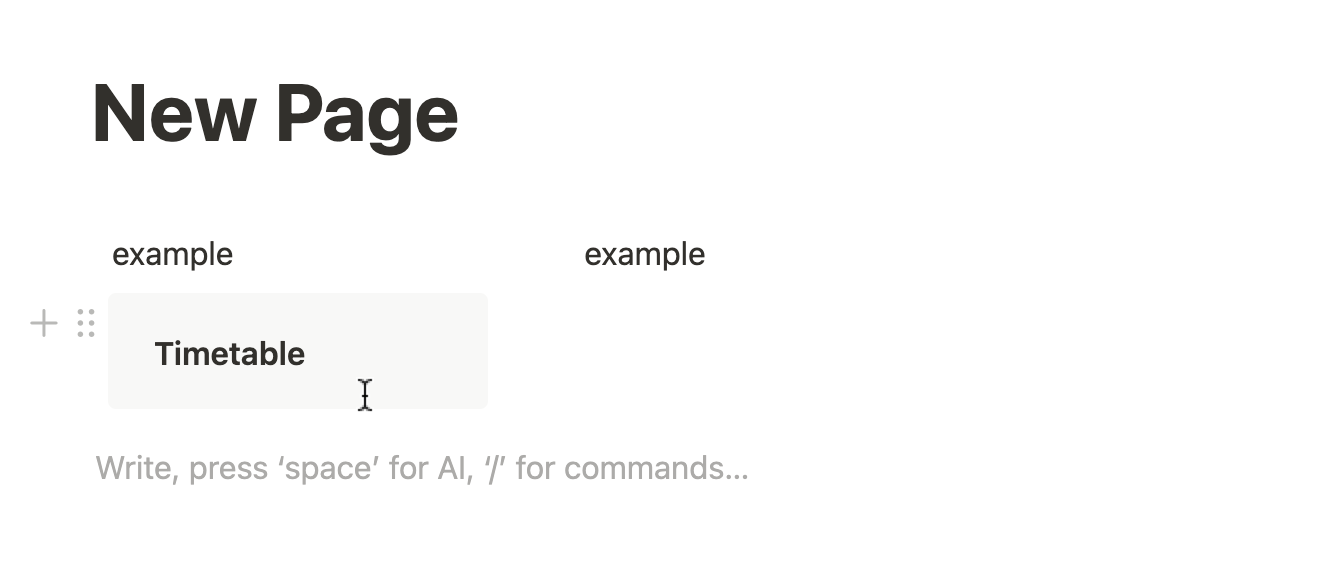
Step 3: Add a daily timetable section
Create a Timetable section in the first column to help you plan your day, hour by hour.
Press / on your keyboard and type “callout” to add a callout block. Give it a title, like: Timetable
Left-click on the selector (the dot icon on the left side of the callout block). This will open customization options, including icon and background color.
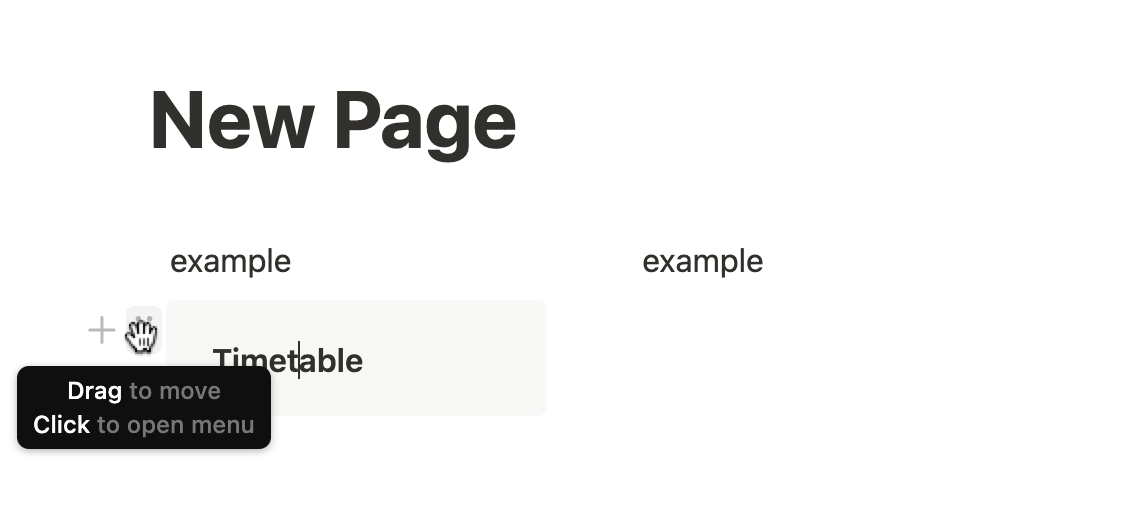
Feel free to personalize the callout by changing the icon and background color to match your style or theme.

Then, add a /table inside the Timetable callout block. Click on the first column of the table and enable “Header Row” so it has a darker background color.
Use the left column to enter your time slots (e.g., 07:00, 07:30, 08:00, etc.), and use the right column to enter the corresponding activities. Add more rows to expand the timetable throughout the day.


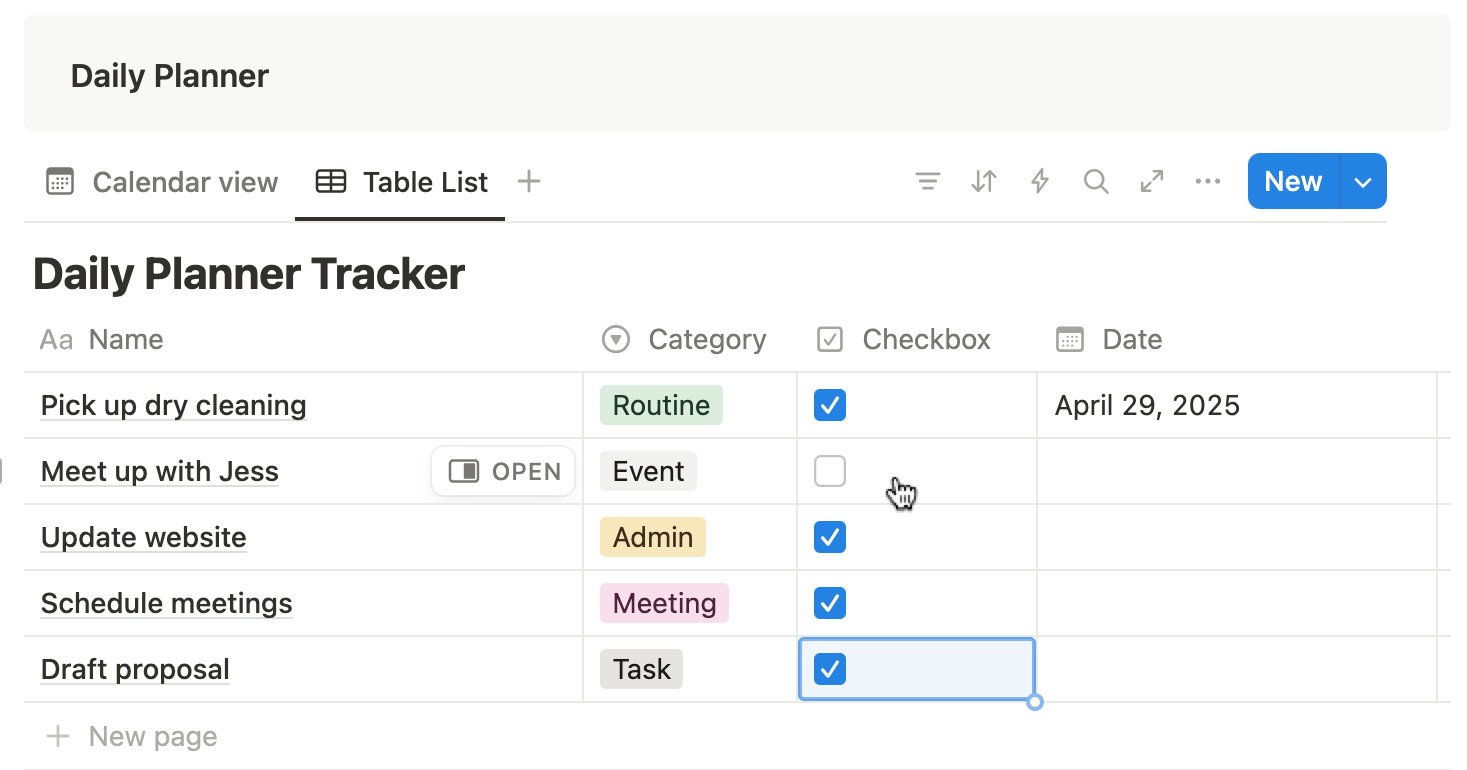
Step 4: Create a daily planner tracker
Now that your timetable is set up, let’s move to the middle column to build your Daily Planner Tracker — this is where you’ll organize tasks, errands, meetings, and other daily items.
1. Add a Section Header
- Insert a Callout block at the top of the middle column.
- Title it something like “Daily Planner” or “Today’s Focus”.
- Customize the icon and background color to make it easy to spot.
2. Add a Calendar View
- Type /calendar and insert a Calendar - Inline database.
- Give your calendar a title like “Daily Tasks” or “My Daily Plan”.

3. Create Your First Entry
- Click “+ New” on the calendar to add your first item.
- This could be a task, meeting, or anything you plan to do today.
- Title it clearly (e.g., “Weekly team call” or “Pick up dry cleaning”).
4. Customize the Properties
- Click on the top-right “...” > Properties to customize.
- Rename “Tags” to something like “Category”.
- Change the property type to Select (instead of Multi-select).
- Add useful categories like:
- Task
- Errand
- Meeting
- Event
- Admin
- Routine
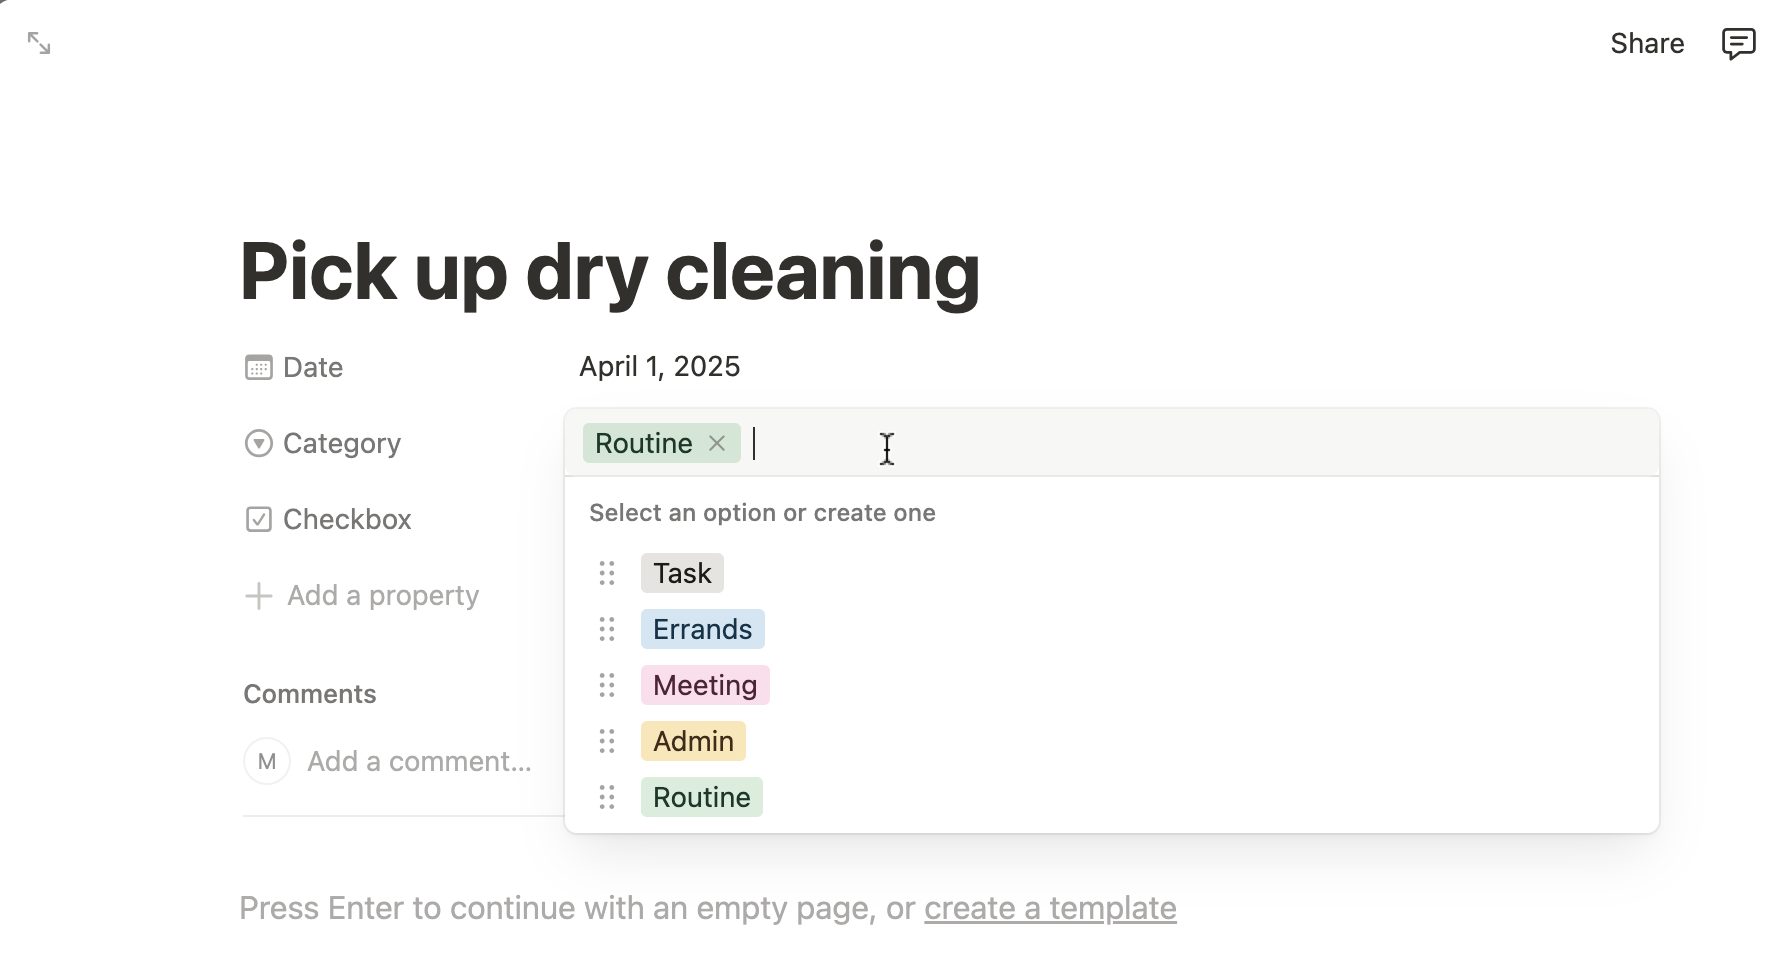
5. Add a Checkbox Property
- Add a new property and change the type to Checkbox.
- Rename it to “Done” or “Complete” — this lets you tick off items as you go.
Step 5: Create a List View for All Your Tasks
While the calendar view is great for visualizing your schedule, sometimes you just want a clean list where you can quickly see all your tasks and check them off.
Here's how to create a simple and useful list view using a table format.
1. Duplicate the Calendar View
- Click on the name of your calendar view (usually says “Calendar” at the top of the database).
- Select “Duplicate view”.
- Rename it to something like “Task List”.

2. Change the Layout to Table View
- With your duplicated view selected, click on the “...” (three dots) next to the view name.
- Choose “Layout” > “Table”.
- This will switch your view to a clean, checklist-style table.
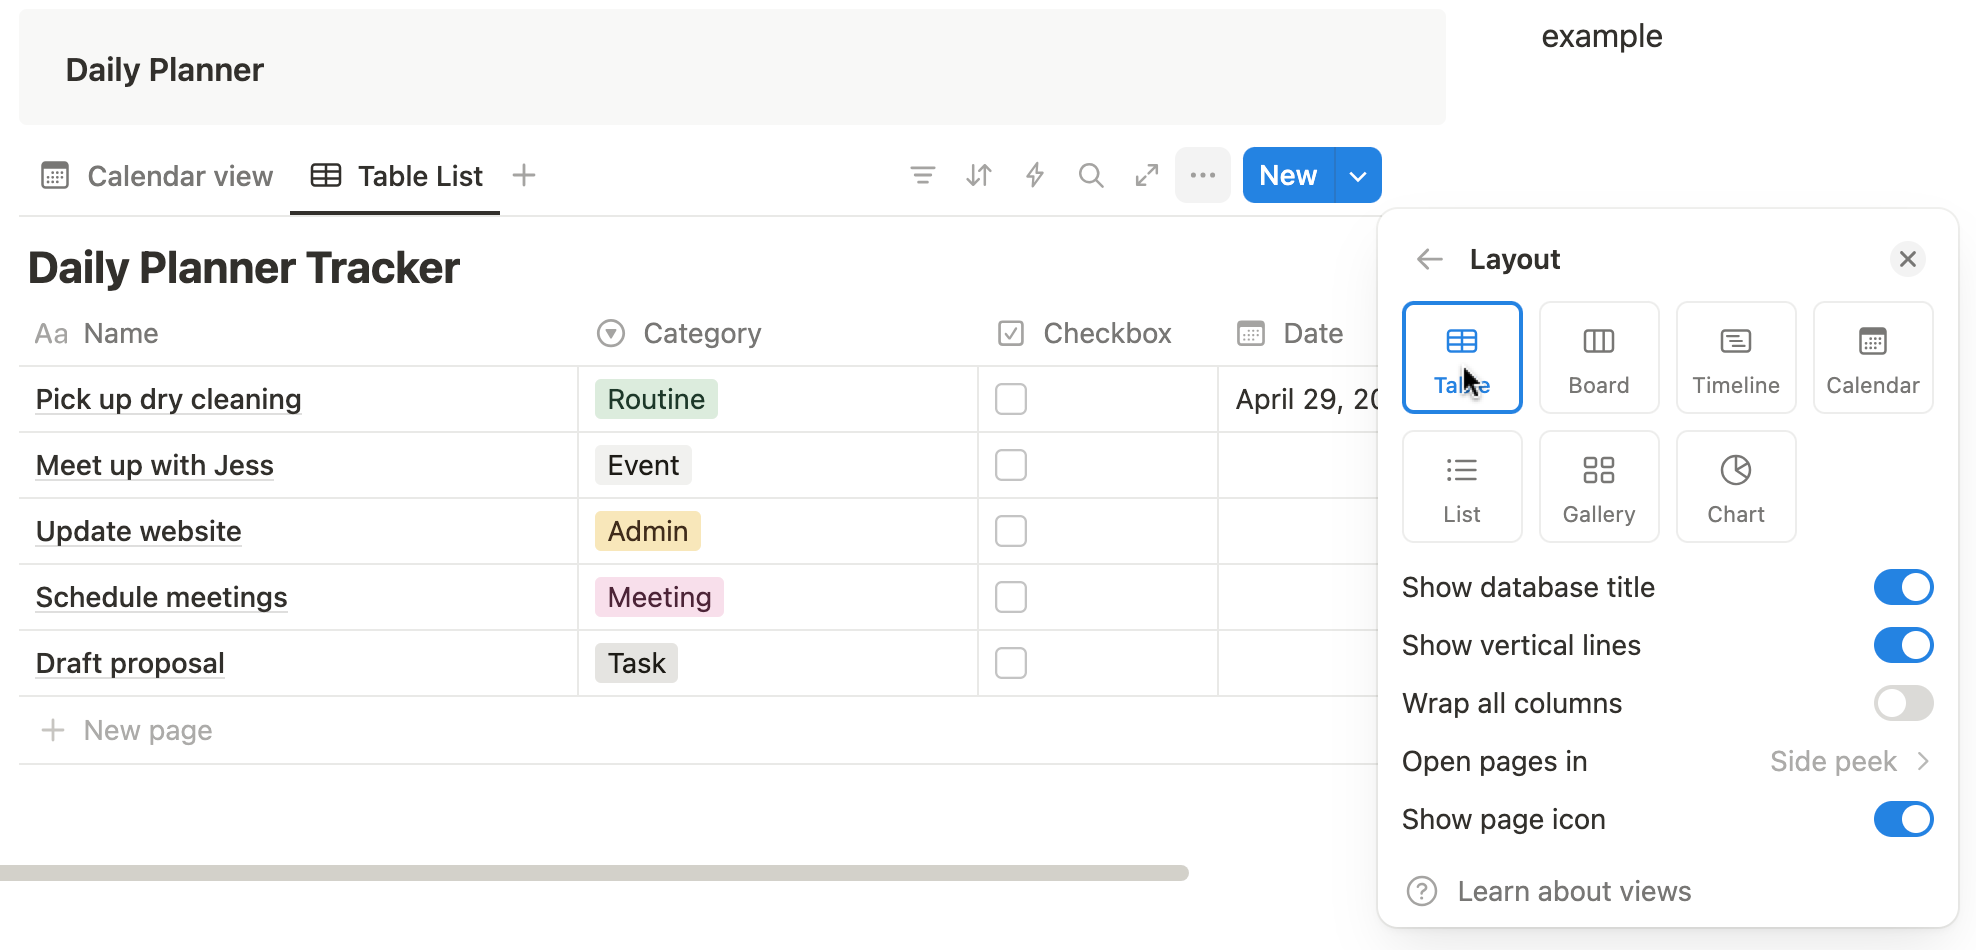
3. Customize the Columns
- Adjust the column order if needed — usually, it's helpful to see:
- Name of the task
- Category (e.g., Task, Meeting)
- Date
- Checkbox for completion
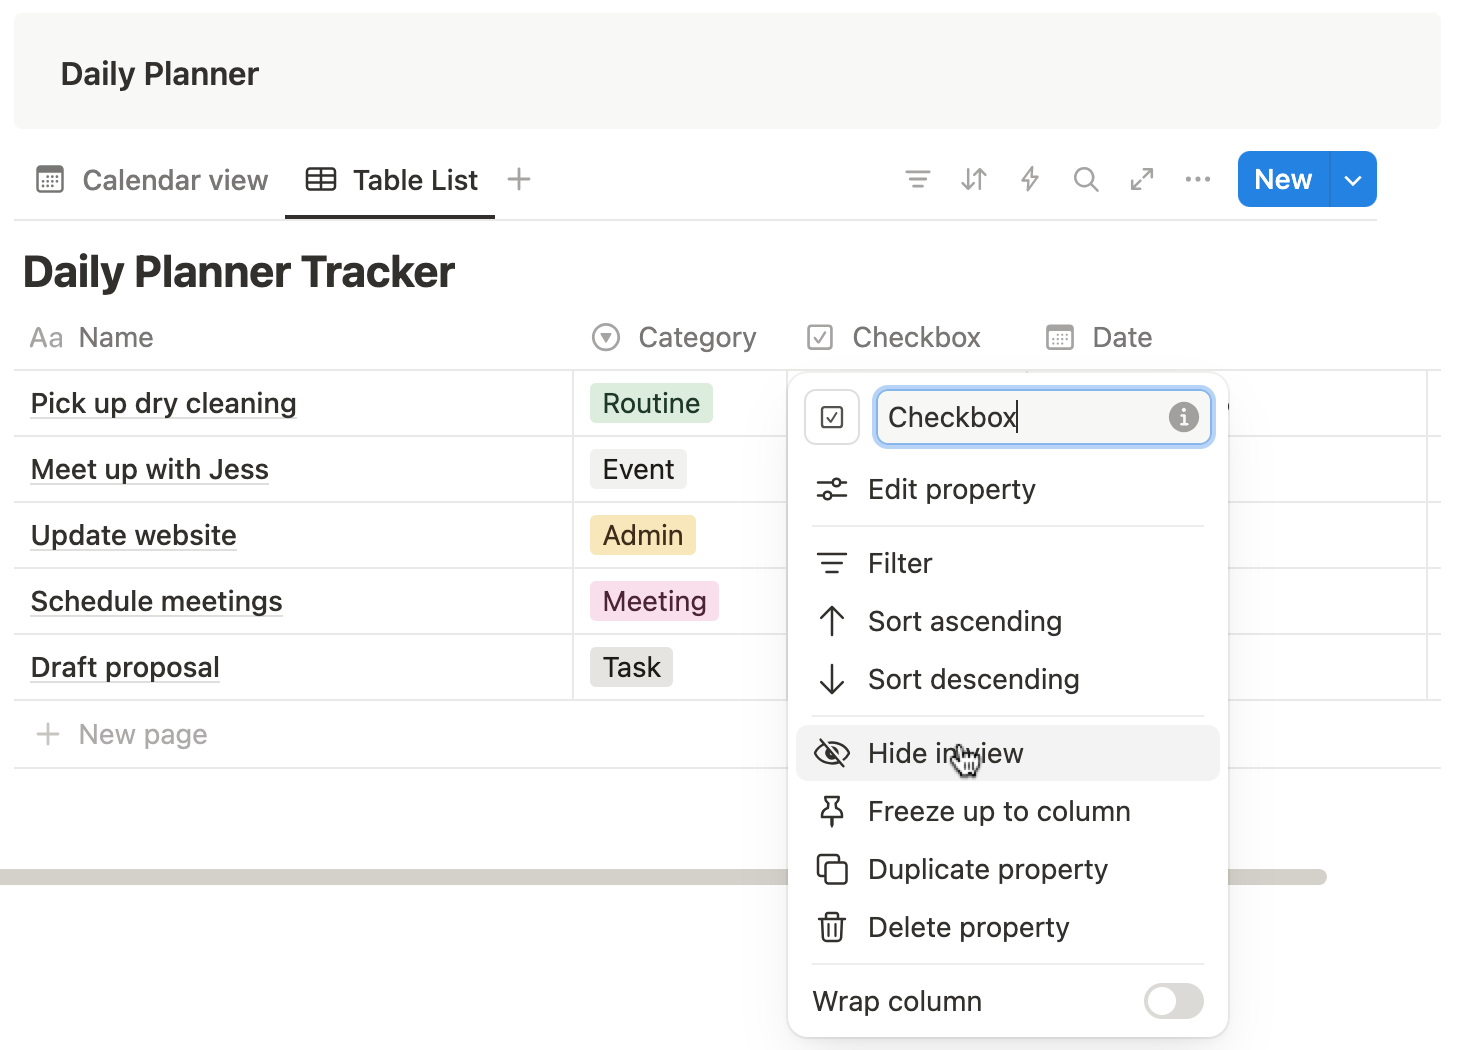
- You can hide any properties you don’t need by clicking Properties and toggling visibility.
4. Make it Easy to Check Off Tasks
- Now, you can scroll through your day’s items and check them off directly from the table.
- When paired with filters (like only showing unchecked tasks), this view becomes a powerful way to stay on top of your to-dos.
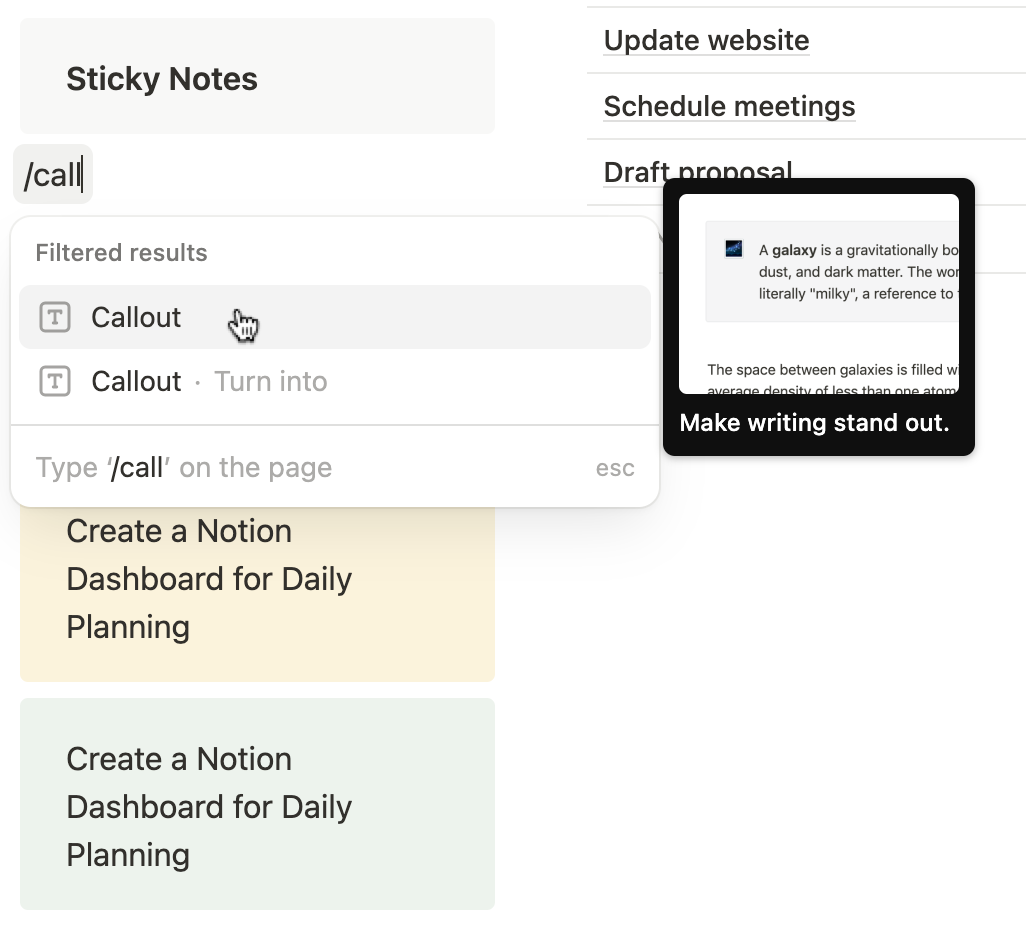
Step 6: Create a sticky note section
This is a great place to jot down quick thoughts, reminders, affirmations, or motivational quotes — anything you want to keep in sight while you plan your day.
1. Create a Section Title
- In an empty space on your dashboard (any column is fine), add a Heading 2 or Callout block.
- Label it something like “Sticky Notes”, “Reminders”, or “Quick Thoughts”.
- Customize the icon and color to make the section visually pop.
2. Add a Sticky Note Using a Callout Block
- Type /callout and hit Enter to insert a Callout block.
- This acts as your digital sticky note.
3. Customize the Look
- Click on the icon selector to choose an emoji (💡📝✅💭 — anything that suits the note’s vibe).
- Change the background color by clicking the color palette icon and picking a color like yellow, pink, blue, or green — just like physical sticky notes.
- Optionally, change the text color to make it more readable.
4. Add More Notes
- Create a few more callout blocks in different colors for different types of notes — like one for reminders, one for affirmations, and one for random ideas.
Step 7: Add a today’s focus board
To stay clear and intentional throughout the day, it's helpful to set a main focus — the one thing that matters most today.
In this step, you’ll create a “Today’s Focus” section that not only keeps you centered but also adds a motivational and visual boost to your dashboard.
1. Add a Section Title
- In the third column (or wherever you'd like), type a heading like: “Today’s Focus” or “Main Priority”
- Make it a Heading 2 or Heading 3 to help it stand out.
2. Add a Photo Cover
- Type /image and upload a photo that inspires you — something that sets the tone for your day.
- Resize the image if needed to fit nicely under the title.

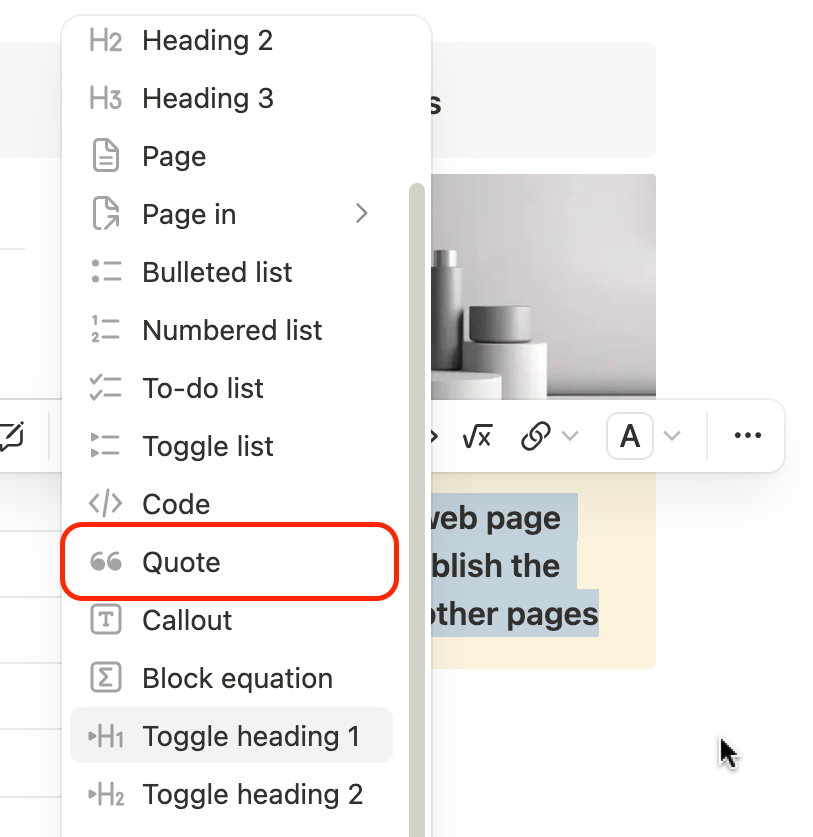
3. Add a Callout or Quote Block
- Below the image, type /callout block. In this block, enter your top priorities for today (e.g., “Finish final draft of presentation”).
- Highlight your goal and format it by selecting “Text” → /quote to make it standout.
Pro Tip: Keep this section small and visible near the top or corner of your dashboard. It works best when it's the first thing you see and a quick reminder of what really matters today.
Step 8: Create a sync database for to-do list
To make checking off your tasks even faster and cleaner, you can create a separate synced view of your daily planner.
This lets you display only the tasks that are still incomplete, without removing anything from your main calendar.
Here’s how to set it up step-by-step:
1. Copy the View Link from Your Daily Planner
- Go to your daily planner calendar (the one you created earlier).
- Click the name of your Calendar View
- Select "Copy link to view" — this copies the specific view of the calendar, not just the database itself.

2. Paste the View on Your Dashboard
- Scroll to an empty space on your dashboard where you want to display your to-do list.
- Press Ctrl + V (or Cmd + V on Mac) to paste the view.
- This creates a synced version of the same database — any changes here will reflect in the original, and vice versa.

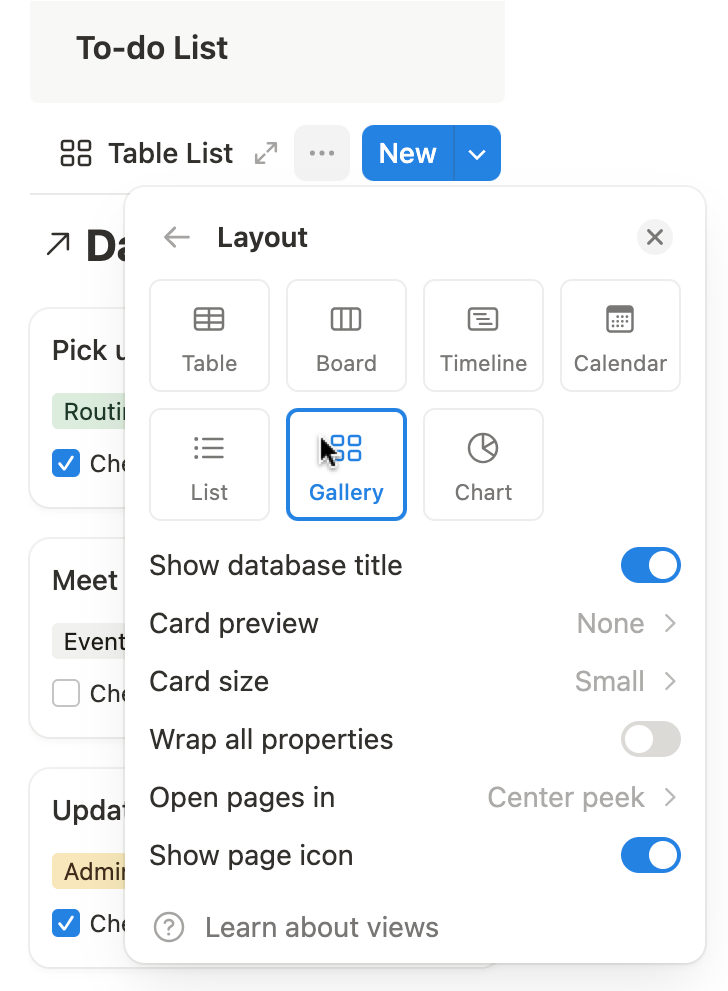
3. Change the Layout to Gallery or List
- You can change this synced view’s layout to suit your style:
- List view for a classic to-do feel
- Gallery view for a more visual card-style layout
- Turn off unnecessary properties or previews for a cleaner look.
- Click on “Properties” to display Checkbox, Category or Date
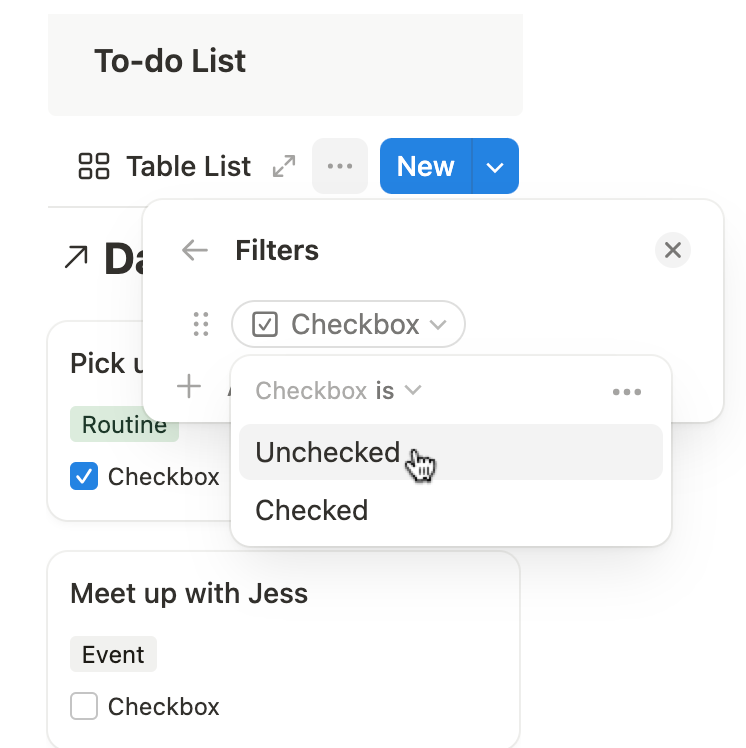
4. Filter the View to Show Only Unchecked Items
- Click “•••” (Options) in the top-right of the pasted view and choose “Edit view”.
- Go to the “Filter” settings.
- Add a filter like this:
- Where ✅ Checkbox → is → Unchecked
Now you’ll only see the tasks you still need to complete — everything else is hidden.
📝 Note: Don’t worry — completed tasks are just hidden, not deleted. You can still see the full list in your calendar view.
Frequently Asked Question
1. How to build a daily planner dashboard in Notion from scratch?
To build a daily planner dashboard in Notion from scratch, start by creating a blank page and turning on full-width. Add a 3-column layout using the /column command. In the left column, create a timetable with a simple 2-column table to track your daily schedule by time. Use the middle column to embed a calendar for tasks and events. In the third column, add widgets like sticky notes, a "Today's Focus" section with a quote block, or a custom goal area. Customize each section with icons, colors, and filters to make the dashboard uniquely yours.
2. Can I sync tasks across different views in Notion without duplicating data?
Yes! Notion allows you to sync the same database across multiple views. For example, you can copy the link to your calendar view (which holds your tasks), paste it elsewhere on the page, and change the layout (e.g. from calendar to gallery or list). It’s not a duplicate — it’s a synced view. Any changes you make in one view (adding, editing, or deleting tasks) will automatically reflect across all other views of the same database.
3. How can I show only unchecked tasks in my Notion to-do list?
To show only unchecked tasks, go to your to-do list view, click on the three dots ⋯, choose Edit View, and add a Filter where the checkbox property is set to Unchecked. This filter hides completed tasks but doesn’t delete them — they remain in the main database and can be viewed from other unfiltered views like the full calendar.
4. What’s the best way to create a sticky note section in Notion?
Use a callout block (/callout) to create sticky notes in Notion. You can personalize them by changing the background color, adding an emoji, and writing short reminders, ideas, or motivational notes inside. Duplicate and rearrange sticky notes throughout your dashboard to organize thoughts or visually highlight key information.
5. How do I create a “Today’s Focus” section with a quote and image in Notion?
To create a “Today’s Focus” section, add a heading or callout for the section title. Then, insert an image using the /image block to upload or link to a motivational photo. Below that, add a /quote block with a powerful message or intention for the day. This combination adds both visual inspiration and mental clarity to your daily dashboard.
6. How do I switch between calendar and list views for tasks in Notion?
To switch between calendar and list views, click the three-dot menu (⋯) in the database view and choose Duplicate View. Then change the layout type — for example, from Calendar to Table or Gallery. This lets you see the same tasks in different formats. You can also filter or sort each view differently, giving you flexible ways to interact with your planning system.
